Developing Apps
Structure
The structure of a Clace application is:
- One Clace application per folder,
staticsub-folder contain static assets - An
app.starStarlark file, defining the application configuration - Predefined builtins, accessed through the
acenamespace - A global called
app, created usingapp = ace.app()call - An optional default handler function called
handler. Other handlers are referenced in the route config - An optional error handler function called
error_handler. Defining theerror_handlerenables automatic error handling - An html template file called
index.go.htmlif using custom layout - If not using custom layout, an html template block called
clace_bodydefined in any*.go.htmlfile, for exampleapp.go.html
Sharing Files Across Apps
The app config property star_base can be use to set the base directory for Starlark files. This is useful when multiple apps need to share common files, like templates, static files, container spec etc. For example, if dir /mydir/ is the base directory with /mydir/app1 and /mydir/app2 as subdirectories containing two apps, creating apps using
clace app create --approve --conf-str star_base=/app1 /mydir /test1
clace app create --approve --conf-str star_base=/app2 /mydir /test2
will create two apps. /mydir/app1/app.star will be used as the app definition for test1 app, static and static_root and template files will be read from /mydir and
App Lifecycle
The Clace app development lifecycle is:
- Create a folder for the app, with the app.star file and templates.
- Start the Clace server. Create an app using
clace app create --dev. This runs the app in dev mode. - In dev mode, some additional files are generated, with
_genin the file name. CSS dependencies and JavaScript modules are downloaded into thestaticfolder. - After the app development is done, the whole app folder can be checked into source control. There is no build step.
- Create a production app,
clace app create, without the--dev. The app is now live. The Clace server can host multiple applications, each application has a dedicated path and optionally a dedicated domain.
Simple Text App
The hello world app for Clace is an ~/myapp/app.star file containing:
def handler(req):
    return "hello world"

app = ace.app("hello",
        routes = [ace.api("/", type=ace.TEXT)]
)
Run clace app create --auth=none ~/myapp /hello. After that, the app is available at /hello
$ curl localhost:25222/hello
hello world
The default response type is ace.HTML. ace.TEXT and ace.JSON are the other options. The data returned by the handler function is converted to the type format specified in the API.
Building Apps from Spec
A spec (specification) can be set for an app. This makes Clace use the spec as a template to specify the app configuration. Use app create --spec python-flask while creating an app or change the spec using app update-metadata spec python-flask /myapp. The spec brings in a set of predefined files. If a file with the same name is already present in the app code, then the spec file is ignored. So if the app code and spec both define a Containerfile, the file from the app code takes precedence. If the app folder contains just app.py
from flask import Flask

app = Flask(__name__)

@app.route("/")
def hello_world():
    return "<p>Hello, World!</p>"
Creating an app like clace app create --approve --spec python-flask ./flaskapp /myapp will do everything required to fully define the Clace app. If the app has additional python dependencies, add a requirements.txt file in the app source code. By default, only the flask package is installed. The file in the app source takes precedence.
See https://github.com/claceio/appspecs for the list of specs. The Clace server build includes these spec by default. Additional specs can de defined by creating a folder $CL_HOME/config/appspecs. Any directory within that is treated as a spec. If the name matches with the predefined ones the spec in the config folder takes precedence. No server restart is required after spec changes. Setting up the server by doing
cd $CL_HOME/config
git clone https://github.com/claceio/appspecs.git
ensures that the specs are updated to the latest version. Periodically doing a git pull on this folder refreshes the specs. Instead of cloning the main spec repo, a custom spec repo can also be used similarly. If no custom specs are defined, the specs as bundled in the Clace server build are available.
App Parameters
Having a file params.star in the app source code causes Clace to load the parameters definitions from that file. Parameters are environment values which can be specified during app creation. A sample param definition is
param("port", type=INT,
      description="The port the flask app is listening on (inside the container)", default=5000)

param("app_name", description="The name for the app", default="Flask App")

param("preserve_host", type=BOOLEAN, description="Whether to preserve the original Host header", default=False)
This is defining three parameters. The type can be one of STRING(default), INT, BOOLEAN, LIST and DICT. The param structure definition is
| Property | Optional | Type | Default | Notes |
|---|---|---|---|---|
| name | False | string | Has to be be a valid starlark keyword | |
| type | True | STRING, INT, BOOLEAN, LISTorDICT | STRING | The data type |
| default | True | Type as set for type | Zero value for the type | |
| description | True | string | The description for the param | |
| required | True | bool | True | If required is True and default value is not specified, then validation fails |
| display_type | True | string | How ths param should be displayed in the UI. Options are FILE, PASSWORD and TEXTAREA, default is text input. |
The parameters are available in the app Starlark code, through the param namespace. For example, param.port, param.app_name etc. See https://github.com/claceio/appspecs/blob/main/python-flask/app.star for an example of how this can be used.
Params are set, during app creation using app create --param port=9000 or using param update port 9000 /myapp. Set value to - to delete the param. Use param list /myapp to list the params.
For containerized apps, all params specified for the app (including ones not specified in params.star spec) are passed to the container at runtime as environment parameters. CL_APP_PATH is a special param passed to the container with the app installation path (without the domain name). PORT is also set with the value of the port number the app is expected to bind to within the container.
Action Apps
For use cases where an existing CLI application or API needs to be exposed as a web app, actions provide an easy solution. First, define the parameters to be exposed in the form UI. Create a params.star file with the params. For example,
param("dir", description="The directory to list files from", default="/tmp")The app defines a run handler which runs ls on the specified directory. The output text is returned.
load ("exec.in", "exec")

def run(dry_run, args):
   out = exec.run("ls", ["-Lla"])
   if out.error:
       return ace.result(out.error)
   return ace.result("File listing for " + args.dir, out.value)

app = ace.app("List Files",
   actions=[ace.action("List Files", "/", run, description="Show the ls -a output for specified directory")],
   permissions=[
     ace.permission("exec.in", "run", ["ls"]),
   ],
)
The app, when accessed will look as shown below, with the ls command output displayed:
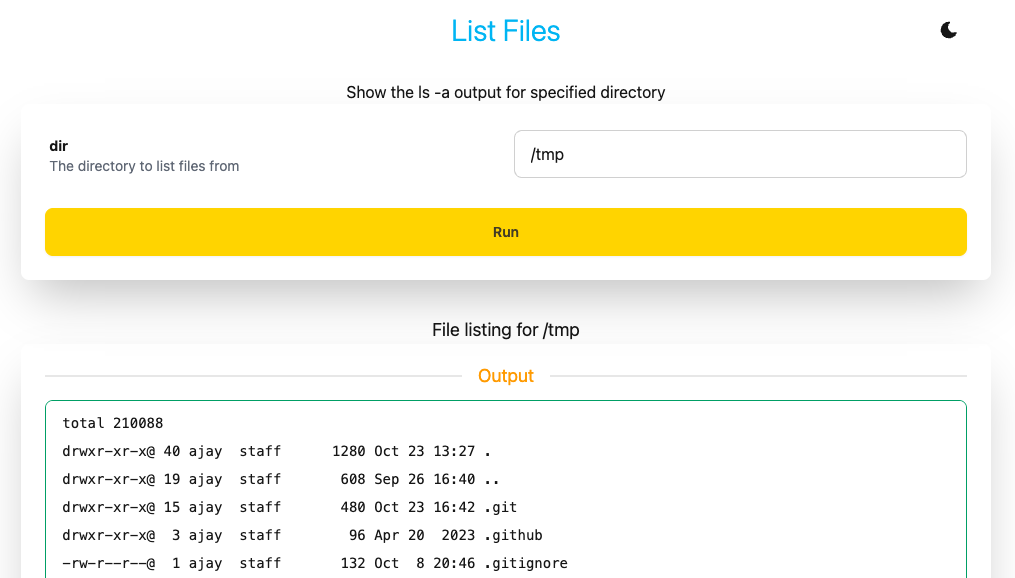
See list files code:demo for the above app. See dictionary code:demo for another actions example app which shows different type of reports. Actions has more details on building app actions.
Containerized App
A containerized apps needs to have a Containerfile (or Dockerfile) to define how the image is built. The app definition can have
load("proxy.in", "proxy")
load("container.in", "container")

app = ace.app("My App",
              routes=[
                  ace.proxy("/", proxy.config(container.URL))
              ],
              container=container.config(container.AUTO),
              permissions=[
                  ace.permission("proxy.in", "config", [container.URL]),
                  ace.permission("container.in", "config", [container.AUTO])
              ]
       )
which completely specifies the app. This is saying that the app is using the container plugin to configure the container and the proxy plugin to proxy all API calls (/ route) to the container url. On the first API call to the app, Clace will build the image, start the container and proxy the API traffic to the appropriate port. No other configuration is required in Starlark. If the container spec does not define the port being exposed, then the container config needs to specify the port number to use. The port number can be parameterized.
Containerized Apps has more details on building containerized apps.
App Permissions
For plugin calls made by the app, the plugin permissions have to be specified in the app permissions and approved in the app metadata. The ace.permission struct definition is
| Property | Optional | Type | Default | Notes |
|---|---|---|---|---|
| plugin | False | string | The plugin name | |
| method | False | string | The method name | |
| arguments | True | list string | The arguments allowed for the call | |
| type | True | string | ace.WRITE | The call type, ace.READ or ace.WRITE |
| secrets | True | list of list of string | The secrets the plugin call can access |
For example ace.permission("proxy.in", "config", [container.URL]) is a plugin call to config method in proxy.in plugin. The first argument has to be container.URL. Additional arguments are allowed. If no arguments are specified in the permission, then there is no restriction on arguments passed at runtime. If the value specified starts with regex:, then the value passed is checked against the specified regex at runtime.
See secrets for details on specifying the secrets which can be accessed by the plugin call.
More examples
There is one disk_usage example here and many in the apps repo. The disk_usage example uses the MVP classless library for styling and shows a basic hypermedia flow. The cowbull game has multiple pages, each page with some dynamic behavior. The cowbull game depends on another service for data persistence, so it is implementing a backend for frontend pattern. For styling, it uses the DaisyUI component library for Tailwind CSS. These two examples work fine with Javascript disabled in the browser, falling back to basic HTML without any HTMX extensions.
The memory_usage example uses the d3 library to show a interactive display of the memory usage for processes on the machine. The plot library is automatically imported as a ECMAScript module and the custom javascript code works with a JSON api on the backend. The default in Clace is hypermedia exchange, JSON can be used for data API’s.